Posing the subject is hard. You can have your lighting set, the background clean, and the camera dialed in, and still walk away with shots that look stiff or just off.
Most of the time, this happens because the subject does not know what to do with their hands or where to put their weight. So they freeze up. And the camera picks up on it every single time.
In this guide, we are going to walk you through the basic poses that work on almost anyone, the right setups for headshots, families, and team photos, and how to fix the awkward stuff that shows up in almost every session.
Let’s get started.
Get the Shoot Set Up Before You Touch the Camera
A lot of pose problems start before the subject ever gets in front of the lens. If your client showed up unprepared or nervous, you will spend the first half of the session fighting that. A few minutes of prep work saves you a bunch of retakes later.
What to Tell Your Client Before They Arrive
Send them a quick email or message with this stuff:
- Wardrobe: solid colors work better than busy patterns. Bring two or three outfits.
- Grooming: hair done the way they normally wear it, fresh shave if they shave, makeup if they wear it.
- What to bring: phone, comb, lint roller, any props for their personal brand.
- Session length: how long it will take, so they do not book a meeting right after.
- A few sample poses: so they can picture what is coming.
It does not need to be a fancy PDF. A short message is fine. The point is they walk in already knowing what to expect.
Get Them Comfortable in the First Two Minutes
Before you touch the camera, just talk to them. About their day, their work, their dog, anything. Show them the first pose by doing it yourself. People copy what they see way faster than what they hear.
If they laugh at your demo, even better. A real laugh relaxes the body in a way you cannot fake later. Some of the best frames usually come from these warmup minutes, so start the camera early.
The Basics That Work on Almost Anyone

These adjustments work for headshots, full-body shots, and most portrait setups. Get these right and the rest of the article is just variations on top.
1. Turn the Body 45 Degrees, Then Face the Camera
Standing square to the lens makes most people look wider and stiffer than they really are. Have them point their feet about 45 degrees away from the camera, then turn the face back toward you. This one small move slims the frame, adds depth, and makes the photo feel less posed.
2. Shift Weight to One Leg
Both legs locked is the universal sign of someone who does not know what to do with their body. Ask them to lean a bit on their back leg. The front hip rises slightly, the body relaxes, and the whole pose softens up.
3. Lean Slightly Forward From the Hips
About an inch or two of forward lean from the hips reads as engaged on camera. Not the head. The hips. People always tip the head forward when you skip this step, and you end up with double chin shadows.
4. Chin Forward and Down
This is the single fix that improves the most portraits. Push the chin forward toward the camera, then tilt it slightly down. It feels weird to the subject. On camera, it sharpens the jaw and gets rid of the under-chin shadow that flattens the face.
5. Drop the Shoulders
Tension shows up in the shoulders first. Most subjects raise them toward their ears without noticing. Either tell them outright (“drop your shoulders an inch”) or have them exhale slowly right before the shot. Watch the shoulders fall. Then shoot.
6. If It Bends, Bend It
A pose with zero bent joints looks like a department store mannequin. Get them to bend at least one elbow, one wrist, or one knee. Hand on hip, fingers curled instead of flat, a soft bend in the front knee. Small bends add up to a portrait that looks like a real person.
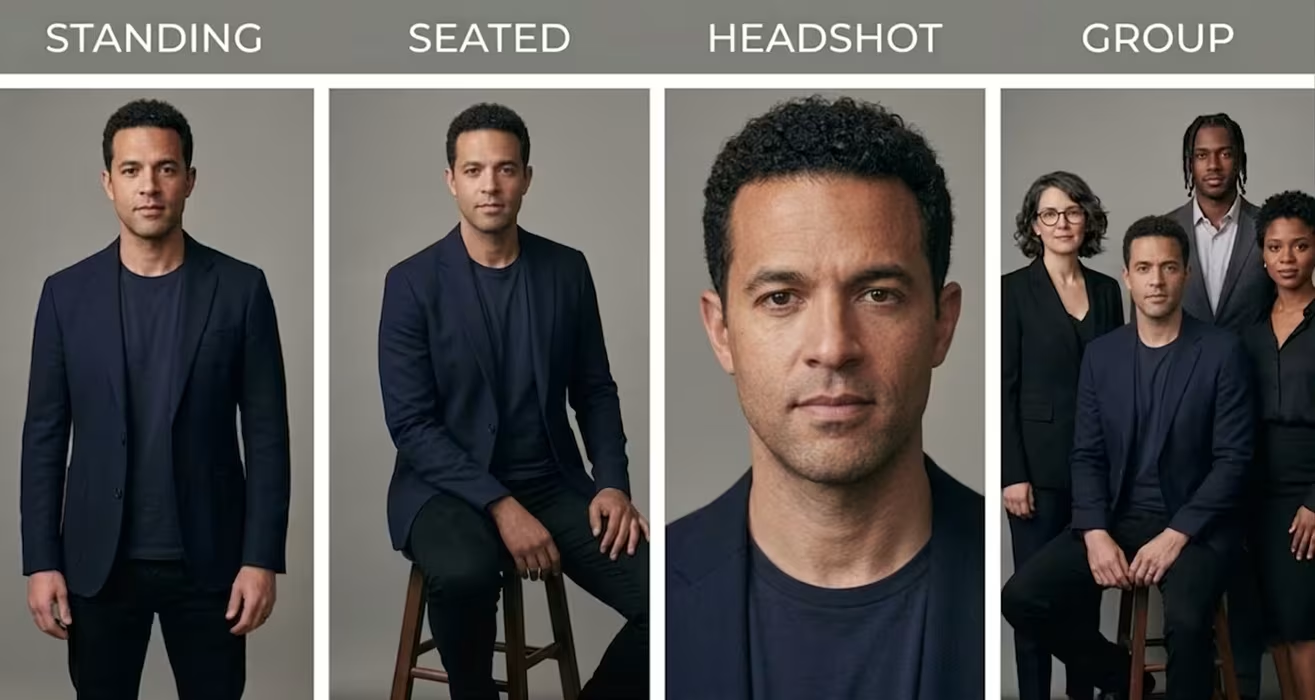
Standing Portrait Poses

Standing poses are the workhorse of any portrait shoot. They work in studios, offices, outdoors, and on white seamless. They also crop down easily into headshots, half-body shots, and full-length frames.
Corporate Standing Pose
For LinkedIn, executive headshots, and any portrait going on a company website:
- Body at 45 degrees, face to camera
- Weight on the back leg
- Hands clasped loosely at the waist or one hand in a pocket with the thumb out
- Shoulders pulled back without puffing the chest
- A small forward lean
Avoid hands flat in pockets with all fingers tucked in. It looks like they are hiding something. Thumb out, fingers slightly visible, is the cleaner move.
Personal Branding and Casual Standing
For founder portraits, creative professionals, and people whose brand is not corporate:
- Lean against a wall, doorway, or piece of furniture
- One leg crossed in front of the other for a relaxed stance
- Arms uncrossed unless they naturally cross them
- Big smiles and laughs work great here, they actually help
Walk Around for More Variations
Once you have the base pose, do a slow lap. Shoot from camera-facing, then from a three-quarter angle, then from the full side. Same pose, different angles. You will leave with three or four usable frames from one setup.
Seated Portrait Poses

Sitting down does not mean the pose has to lose energy. Most seated portraits go bad because the subject sinks back into the chair and gravity takes over.
The Edge of the Chair Rule
Have your subject sit on the front third of the chair or sofa. Back straight, core engaged, feet flat on the floor. This is basically the seated version of the slight forward lean. It keeps the spine long and stops the chin from dropping into the neck.
Desk and Office Seated Poses
For corporate portraits at a workspace:
- Front third of the chair, small forward lean
- Hands on the desk, holding a pen, or on a closed laptop
- Eyes either to camera or looking at something on the desk
- Cross the ankles, not the legs. Crossed legs raise one knee and break the line.
If you can, get them interacting with something on the desk. Hands holding a notebook beat hands floating awkwardly above a desk pretty much every time.
Casual Seated Poses
For lifestyle and personal brand shoots:
- Sit on a step, low wall, or floor
- One leg extended, one leg bent
- Hands resting on the bent knee or behind for support
- Shift weight to one hip to create asymmetry
Try not to point both legs straight at the camera. It shortens the legs and flattens the frame. Angle them off to one side, or extend one leg toward you and tuck the other.
Two-Person Seated Shots
When shooting two people together, vary the height. One sits in the chair, the other perches on the armrest or stands behind. Same body language between both of them (both leaning in, both facing camera) shows they are partners, not strangers.
Posing for Professional Headshots

Headshots are their own thing. The crop is tight, so every small mistake gets magnified.
The Slight Head Tilt
A 5 to 15 degree head tilt softens any headshot. Tilt toward the higher shoulder for a warmer look. Tilt away from it for something more confident. Go past 15 degrees and it starts to look fake.
Eyes On, Then Off, Then On Again
Tell subjects to look at a spot just above the lens, not into it. Then drop the eyes to camera for the actual shot. Holding eye contact with the lens for too long creates that glazed stare. Breaking and returning keeps the eyes alive.
Beat the Smile Fatigue
Holding a smile for 60 seconds makes any smile look fake. Shoot in short bursts. Have them relax their face, exhale, then bring the smile back for three to five frames. Then rest. The frames right after a real laugh or quick joke are usually the keepers.
What to Do With the Hands
In a tight headshot crop, the hands are usually out of frame, but where the arms sit still affects the shoulders. Have them pretend to hold a small bag at waist height. It pulls the shoulders down and stops the upper body from looking stiff. Crossed arms read defensive unless the brand is going for exactly that.
The Over-the-Shoulder Shot
A turn-around shot adds variety to any session. Subject faces away, then turns the head and upper body back toward the camera. It feels candid, like you caught them mid-thought. Great for actors, personal brand portraits, and anyone who wants one frame that does not look like a corporate ID photo.
Group Portrait Poses

Group shots have one big rule: never put everyone in a straight line at the same height. That is a sports team photo, not a portrait.
Stagger the Heights
Mix sitting and standing. Use stairs, chairs, low walls, or any kind of slope. The goal is for every head to land at a different vertical level. It adds depth and makes height differences less noticeable.
Slight Arc, Not a Wall
Bend the group into a soft curve so the people on the outside angle slightly toward the center. Everyone is more visible. Nobody feels stuck on the end of a row.
Family Portrait Poses
Family photos live and die on natural connection:
- Use light contact: a hand on a shoulder, an arm linked, a kid leaning into a parent
- Position smaller kids in front or on a parent’s lap
- Mix posed shots with candid moments where the family is looking at each other instead of the camera
- Let small kids move between frames. Forcing a three-year-old to sit still is a losing fight.
Corporate Team Portraits
For company team pages and about-us shots:
- Keep poses consistent but not identical. Everyone slightly angled, weight on one leg, but not robotic.
- Break big teams into clusters of three or four for a more dynamic look
- Maintain equal spacing so nobody looks pushed out
- For 10+ people, shoot from a higher angle. A second-floor balcony, a step ladder, or a drone outdoors.
When Heights Are Way Different
If you have a 5’2″ person standing next to a 6’5″ person, the line shot looks awkward. Two easy fixes:
- Sit the taller person on a chair, stool, or low wall to bring their head closer to the shorter subject
- Stagger them front to back instead of side by side, so the height reads as depth instead of mismatch
Try not to put the tallest and shortest people side by side unless you are doing it on purpose.
Common Posing Problems and How to Fix Them
Most shoots hit at least one of these. Have a fix ready.
The Camera Shy Subject
Start with poses that hide the hands and feet. Seated, hands on lap, three-quarter angle facing away then back. Less to think about means less to freeze on. Show them preview shots every few frames so they can see what is working. Compliment specifics (“your eyes are great in that last one”) instead of generic praise.
Studio music helps. Pick something the subject mentioned during the warmup chat. Their shoulders will drop within 30 seconds.
Glasses Glare
A small downward tilt of the head usually breaks the reflection. If that does not work, push the glasses a few millimeters higher on the nose so the lens angles down. Light hits the top of the frame instead of straight back at the camera. If the glare still lands, just finish the shoot and clean it up in retouching after.
Awkward Hands
Hands are the number one source of weird-looking portraits. Some go-to fixes:
- Give them something to hold (a coffee mug, a notebook, a pen, a jacket)
- Hands in pockets with thumbs out
- Hand on hip with a slight wrist bend
- Hands clasped at the waist for formal shots
If hands keep going stiff, ask the subject to shake them out between frames. Resets the tension fast.
Stiff Posture
Three-second exhale before the shot. Tell the subject to breathe out slowly, drop their shoulders, then look at you. Shoot on the exhale, not the inhale. Inhale shots always tense the upper body.
Running Out of Time
Keep a shot list on your phone or printed. Start with the three safest poses for the subject. If the session gets cut short, you still walk away with usable frames. Save the experimental setups for when you know you have time.
Portrait Posing Mistakes That Show Up in Every Shoot
A quick checklist of the ones that pop up the most when we retouch client shoots:
- Both feet pointed at the camera. Square stance, square frame, flat portrait. Always angle off.
- Locked knees. Looks stiff in the frame and gets uncomfortable for the subject after 30 seconds. Soft bend in the front knee.
- Chin tucked into the neck. Creates a double chin shadow even on subjects without one. Chin forward, then slightly down.
- Shoulders up by the ears. Especially in cold studios. Watch for it and call it out before the shutter.
- Flat pancake hands with all five fingers straight. Curl them slightly or give them something to hold.
- Frozen smile. The longer they hold it, the worse it gets. Bursts, rest, repeat.
- Posing without checking the light. A great pose with raccoon-eye shadows is a wasted frame. Walk around them once with your light in mind before you commit.
Frequently Asked Questions
How do you pose for a professional headshot?
Turn your body 45 degrees from the camera, then face the lens. Shift weight to your back leg. Push the chin forward and down. Drop your shoulders. Smile in short bursts so the face stays relaxed.
What is the most flattering portrait pose for any body type?
The 45-degree body angle works on almost everyone. Pair it with weight on one leg, a small hip shift, and a head tilt of a few degrees. It looks natural instead of stiff.
How do you direct someone who is camera shy?
Start with seated poses that hide the hands. Show them previews every few frames. Play music they like. Most people loosen up within the first 10 minutes once they see the shots are working.
What are the best poses for group photos?
Stagger heights using stairs, chairs, or a sit and stand mix. Bend the group into a soft arc, not a straight line. For families, use light contact. For teams, break big groups into smaller clusters.
How do you pose hands in a portrait?
Give them something to hold, like a coffee mug, notebook, or jacket. If no prop is around, try hands in pockets with thumbs out, or hands clasped loosely at the waist. Avoid flat open palms.
What angle should I shoot portraits from?
Eye-level is the default for headshots. Slightly above flatters most faces by lengthening the neck and slimming the jaw. Shooting from below makes the subject look heavier. Stay level or above unless you have a creative reason to go low.
How long should a portrait session last?
A solo headshot session usually takes 30 to 60 minutes. Personal branding runs 60 to 90 minutes with outfit changes. Family or group sessions need at least 60 minutes, longer with small kids.
Do I need professional editing on portrait photos?
For portraits going to clients, yes. Even well lit and well posed shots usually need skin retouching, background cleanup, and color matching across the set. Doing it yourself between shoots eats hours.
Final Words
That wraps up our guide on portrait poses. Posing is not about knowing a hundred named positions. It is about getting a few basics right (body angle, weight on one leg, chin forward, shoulders down) and then adjusting them for the person in front of you.
Once these become muscle memory, the rest is just reading the subject. Some need more direction. Some need less. The more shoots you do, the faster you spot what works.
And when the shoot is done, the editing is what finishes the job. GraphicXer handles portrait retouching for studios, agencies, and freelance photographers, so you can stay on shoots while we clean up skin tones, backgrounds, and color across the full set.